Key Takeaways
- A healthy SCOBY and 1-2 cups of starter tea from a previous batch or store-bought raw kombucha are essential for successful first-time brewing.
- The ideal fermentation temperature range is 20-27°C (68-80°F), with warmer temperatures accelerating fermentation and cooler temperatures slowing it.
- First fermentation (F1) takes 7-14 days and creates the base kombucha, while optional second fermentation (F2) adds carbonation and flavor over 2-4 days.
- Proper pH levels (2.5-3.5) protect against contamination and ensure safe fermentation—test with pH strips after the first batch.
- Home-brewed kombucha costs approximately $0.50-$1.00 per liter compared to $4-6 for commercial bottles, according to Kombucha Brewers International.
Kombucha fermentation transforms ordinary tea into a functional beverage containing beneficial bacteria, organic acids, and trace amounts of B vitamins. The fermentation process mirrors traditional brewing methods documented for over two millennia, yet requires no specialized equipment beyond basic kitchen tools. Understanding the microbiology, timing, and ingredient ratios ensures consistent results from your first batch forward.
What Equipment Do You Need to Brew Kombucha at Home?
Home kombucha brewing requires minimal investment in equipment, most of which already exists in well-stocked kitchens. The fermentation vessel selection directly impacts batch size, SCOBY health, and ease of handling throughout the process.
Essential equipment for first-time kombucha brewers includes a wide-mouth glass jar (1-4 liters), breathable cloth cover, rubber band, pH testing strips, glass bottles for second fermentation, and a non-metallic stirring utensil. Glass remains the gold standard for fermentation vessels because it's non-reactive, transparent for monitoring fermentation progress, and easy to sanitize. According to Kombucha Kamp, ceramic vessels with lead-free glazes work equally well but prevent visual monitoring of SCOBY development.
| Equipment | Purpose | Acceptable Alternatives |
|---|---|---|
| Wide-mouth glass jar (3.8L) | Primary fermentation vessel | Food-grade ceramic crock |
| Tightly-woven cloth | Allows air flow, blocks contaminants | Coffee filter, paper towel |
| Rubber band or twine | Secures cloth cover | Large elastic band |
| Wooden or plastic spoon | Stirs without reacting with acids | Silicone spatula |
| Glass bottles (500ml) | Second fermentation and storage | Swing-top bottles, mason jars |
| pH testing strips (range 2.0-4.5) | Verifies safe acidity levels | Digital pH meter |
| Thermometer | Monitors tea cooling and fermentation temp | Infrared thermometer |
Avoid metal containers and utensils during fermentation. The organic acids produced during kombucha brewing—primarily acetic and gluconic acid—react with metals, potentially leaching unwanted compounds into the brew and damaging equipment. Stainless steel is acceptable for brief contact during bottling, but prolonged exposure should be avoided entirely.
Where Do You Get a SCOBY for Your First Batch?
The SCOBY (symbiotic culture of bacteria and yeast) functions as the living catalyst that converts sweet tea into kombucha. This cellulose-based biofilm houses the microorganisms responsible for fermentation, including Acetobacter bacteria and various Saccharomyces yeast strains. Research published in PubMed identifies over 20 bacterial species commonly found in kombucha cultures, with composition varying based on fermentation conditions and regional culture sources.
First-time brewers acquire SCOBYs through three primary methods: purchasing from reputable suppliers, receiving cultures from active brewers, or growing a SCOBY from store-bought raw kombucha. Cultures for Health and The Kombucha Shop offer dehydrated and active SCOBY cultures with documented microbial compositions, eliminating uncertainty about culture viability.
Growing a SCOBY from commercial kombucha requires patience but costs less than purchasing established cultures. Pour one bottle (500ml) of unflavored, unpasteurized kombucha into a clean glass jar, add 500ml of sweetened cooled tea, cover with cloth, and wait 2-4 weeks. A thin SCOBY layer forms on the liquid surface as the culture colonizes the new environment. The resulting SCOBY may be thinner than purchased cultures but functions identically once established through 2-3 brewing cycles.
How to Identify a Healthy SCOBY
Healthy SCOBYs appear cream to light tan in color with smooth or slightly bumpy surfaces. The culture may have brown stringy yeast strands attached to the underside—this is normal and beneficial. Thickness varies from 3mm for new cultures to over 2cm for established SCOBYs, with thicker cultures not necessarily indicating superior fermentation capacity.
Contaminated or damaged SCOBYs show distinct warning signs: fuzzy colored mold (typically green, black, or orange), strong putrid odors unlike vinegar, or extensive dark spots beyond typical yeast accumulation. According to Kombucha Brewers International, mold contamination occurs in less than 1% of properly maintained home brewing operations when pH levels remain below 4.0 throughout fermentation.
What Ingredients Create the Perfect Kombucha Base?
Kombucha fermentation begins with four simple ingredients: tea, sugar, water, and starter liquid. The ingredient quality and ratios directly determine fermentation speed, final flavor profile, and probiotic content of the finished beverage.
Tea Selection and Preparation
Black tea and green tea serve as the traditional and most reliable bases for kombucha brewing, providing the nitrogen, minerals, and caffeine that nourish SCOBY microorganisms. Camellia sinensis—the plant producing all true tea varieties—contains compounds that support robust bacterial and yeast growth during fermentation. Research from the Specialty Coffee Association on beverage fermentation demonstrates that caffeine content supports yeast metabolism, though kombucha fermentation reduces caffeine levels by 10-25% through microbial processing.
Loose leaf tea and bagged tea both work effectively, though loose leaf varieties typically contain fewer processing additives. Avoid flavored teas containing oils (Earl Grey bergamot, chai spices) during first fermentation, as essential oils can damage SCOBY health. Herbal tisanes like chamomile or peppermint lack the necessary nutrients for sustained fermentation and should comprise no more than 25% of the tea blend when combined with true tea.
The ideal tea brewing ratio uses 8-10 grams of tea per liter of water, steeped for 5-7 minutes in water just below boiling (90-95°C). Over-steeping extracts excessive tannins that slow fermentation, while under-steeping provides insufficient nutrients for optimal microbial activity. For quality loose leaf options that work excellently in kombucha brewing, explore the selection at loose leaf teas from BellofattoBrews.
Sugar Requirements and Alternatives
Plain white cane sugar provides the most consistent fermentation results because it dissolves completely and contains no molasses or minerals that alter yeast metabolism. The standard ratio uses 50-100 grams of sugar per liter of tea, with 70 grams (approximately 1/3 cup) representing the middle ground between complete fermentation and residual sweetness.
The fermentation process consumes 60-80% of added sugar according to nutritional analyses published in NCBI, converting it into organic acids, carbon dioxide, and trace alcohol (typically 0.5-1.5% ABV). This transformation reduces the final sugar content to approximately 2-4 grams per 100ml in fully fermented kombucha—comparable to many commercial beverages marketed as "low sugar."
Alternative sweeteners produce varying results. Honey creates a distinctive flavor but may slow initial fermentation due to antimicrobial compounds. Evaporated cane juice and organic sugar work identically to white sugar. Avoid artificial sweeteners entirely—SCOBY organisms cannot metabolize aspartame, stevia, or sucralose, resulting in fermentation failure.
Water Quality Matters
Filtered water free from chlorine and chloramine produces the healthiest fermentation environment. Municipal tap water treated with chlorine requires standing overnight or boiling to dissipate the chemical, while chloramine-treated water needs carbon filtration for removal. High mineral content (hard water) doesn't harm kombucha but may produce cloudier finished beverages.
Related: What Is Jun Tea — Ancient Fermented Green Tea Elixir
Step-by-Step First Fermentation Process
First fermentation (F1) transforms sweet tea into acidic, slightly fizzy kombucha through controlled bacterial and yeast activity. This primary fermentation establishes the flavor foundation and probiotic content that defines quality kombucha.
- Brew and sweeten the tea: Steep 8-10 grams of tea in 1 liter of near-boiling water for 5-7 minutes. Remove tea leaves and dissolve 70 grams of sugar while the liquid remains hot. Stirring while hot ensures complete dissolution.
- Cool completely: Allow sweetened tea to reach room temperature (20-27°C). Never add SCOBY to hot liquid—temperatures above 32°C kill beneficial microorganisms. Cooling typically requires 2-4 hours at room temperature or 30-60 minutes in an ice bath.
- Combine with starter liquid: Pour cooled sweet tea into the fermentation vessel. Add 100-200ml of starter liquid (10-20% of total volume). The starter liquid lowers pH immediately, creating an acidic environment that prevents pathogenic bacteria colonization.
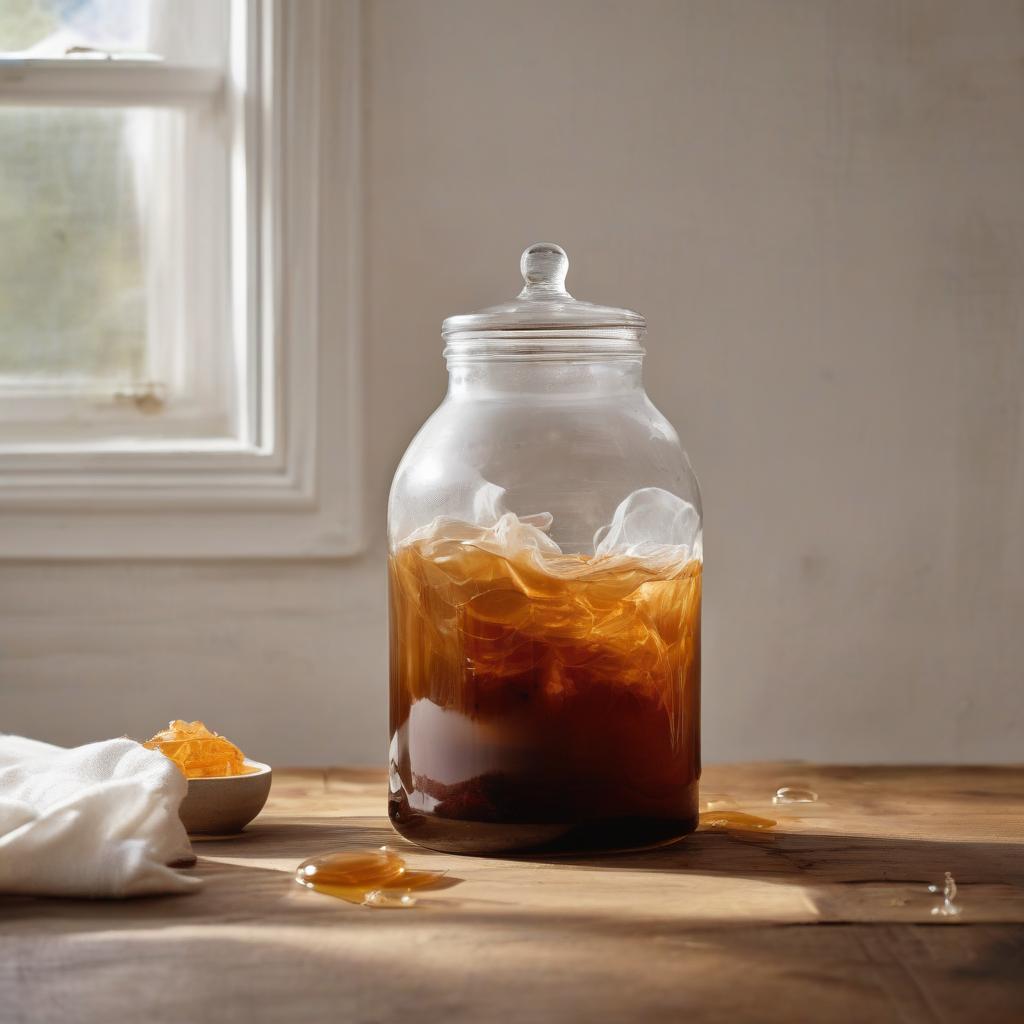
- Add the SCOBY: Gently place the SCOBY on the liquid surface. The culture may float, sink, or orient sideways—all positions allow successful fermentation. A new SCOBY layer forms on the liquid surface regardless of the mother culture's position.
- Cover and ferment: Secure breathable cloth over the jar opening with a rubber band. Place the jar in a location with stable temperature (20-27°C), away from direct sunlight and strong odors. Avoid moving or disturbing the jar during fermentation.
- Taste test starting day 5: Insert a straw beneath the SCOBY to sample the developing kombucha without disturbing the culture layer. The flavor progresses from sweet tea toward increasingly tart, vinegary notes as fermentation continues. Target pH should reach 2.5-3.5 by day 7.
- Harvest when balanced: Kombucha reaches optimal flavor when sweetness and tartness achieve personal preference, typically 7-14 days depending on temperature and taste preference. Warmer temperatures (27°C) accelerate fermentation to 5-7 days, while cooler temperatures (20°C) extend it to 12-18 days.
Reserve 1-2 cups of finished kombucha as starter liquid for the next batch before flavoring or consuming. This starter tea contains the highest concentration of beneficial acids and microorganisms, ensuring rapid fermentation in subsequent batches. Store the SCOBY in starter liquid at room temperature for continuous brewing or refrigerate for temporary breaks between batches.
Fermentation Temperature Control
Temperature regulation represents the single most critical variable in fermentation speed and flavor development. Studies published in ScienceDirect demonstrate that temperatures below 18°C dramatically slow fermentation, sometimes stalling it entirely, while temperatures above 32°C stress or kill beneficial microorganisms.
Seasonal temperature fluctuations require brewing schedule adjustments. Summer batches in warm climates may finish in 5-7 days, while winter brewing in unheated spaces can require 18-21 days. Brewers in consistently cool environments use heating mats designed for seed germination, maintaining jars at 24-26°C for year-round consistent results.
How Does Second Fermentation Add Flavor and Carbonation?
Second fermentation (F2) occurs in sealed bottles after removing the SCOBY, allowing carbon dioxide to dissolve into the liquid and creating the characteristic fizz absent from first fermentation. This stage also provides the opportunity to introduce fruit, herbs, spices, and other flavorings without exposing the SCOBY to potentially harmful compounds.
The F2 process captures CO₂ produced by residual yeasts consuming remaining sugars in an anaerobic environment. Proper second fermentation produces carbonation levels comparable to commercial soft drinks (2.5-4.0 volumes of CO₂) within 2-4 days at room temperature. According to data from Kombucha Kamp, bottles stored at 24°C reach optimal carbonation in 48-72 hours, while refrigeration immediately halts the process.
Flavoring Methods and Combinations
Add flavorings at the beginning of second fermentation by placing ingredients directly in bottles before filling with base kombucha. Fresh fruit purees, fruit juice, grated ginger, and fresh herbs all work effectively. The standard ratio uses 10-20% flavoring to 80-90% plain kombucha by volume.
Proven flavoring combinations include:
- Ginger-lemon: 2cm fresh ginger (grated) + 15ml fresh lemon juice per 500ml bottle
- Berry blend: 50g mixed berry puree per 500ml bottle
- Mango-turmeric: 60g mango puree + 1/2 teaspoon turmeric powder per 500ml bottle
- Mint-lime: 5-6 fresh mint leaves + 15ml lime juice per 500ml bottle
- Apple-cinnamon: 100ml apple juice + 1 cinnamon stick per 500ml bottle
Fruit additions increase available sugars, accelerating carbonation but also raising the risk of over-carbonation and bottle explosions. Monitor fruit-flavored bottles closely, releasing pressure ("burping") every 24 hours until experience indicates safe fermentation timelines. For brewing technique guidance that translates well to kombucha preparation, reference the BellofattoBrews brewing guide for precision approaches to beverage crafting.
Bottle Selection and Safety
Use only bottles designed to withstand pressure: swing-top bottles with ceramic gaskets, heavy-duty flip-top bottles, or thick-walled beer bottles with crown caps. Standard wine bottles and thin glass containers cannot safely contain kombucha carbonation and may shatter explosively.
Fill bottles to within 2-3cm of the top, leaving headspace for CO₂ accumulation. Seal tightly and store at room temperature for 2-4 days, then refrigerate to halt fermentation. Refrigerated kombucha maintains carbonation and flavor for 2-3 months, though probiotic counts gradually decrease over time according to research in food microbiology.
What Are Common Beginner Mistakes to Avoid?
New kombucha brewers encounter predictable challenges that experienced brewers learn to prevent through attention to sanitation, timing, and environmental factors. Understanding these pitfalls before starting reduces failed batches and accelerates the learning curve.
Contamination from Inadequate Sanitation
All equipment must be thoroughly cleaned with hot water and allowed to air dry before use. Soap residues can damage SCOBY health, so thorough rinsing is essential. Many experienced brewers use white vinegar as a final rinse—its acidity mirrors the kombucha environment and evaporates completely without leaving residues.
Hands should be washed thoroughly before handling SCOBYs, though brief contact causes no harm. The SCOBY's acidic environment provides natural protection against most pathogens, but introducing large bacterial loads from unwashed hands can temporarily stress the culture.
Metal Contact During Fermentation
Extended metal contact with acidic kombucha causes metallic off-flavors and potential heavy metal leaching. While brief contact with stainless steel during bottling poses minimal risk, fermentation vessels, stirring utensils, and storage containers should be glass, ceramic, wood, or food-grade plastic exclusively.
Temperature Extremes and Fluctuations
Placing fermentation vessels in direct sunlight, near heating vents, or in uninsulated spaces creates temperature swings that stress SCOBY microorganisms. Consistent temperature yields consistent results—a stable 24°C produces more reliable kombucha than temperatures fluctuating between 18-29°C throughout the day.
Over-Fermentation
Kombucha left too long becomes increasingly vinegary as bacteria continue producing acetic acid. While perfectly safe to consume, over-fermented kombucha requires dilution with juice or fresh tea for palatability. The positive side: over-fermented batches make excellent starter liquid for subsequent brews due to high acid content and active microbial populations.
Insufficient Starter Liquid
Using too little starter liquid raises initial pH above 4.5, creating a window where spoilage organisms can colonize before beneficial acids establish protective acidity. The minimum safe ratio uses 10% starter liquid by volume—100ml per liter of sweet tea—with 20% providing faster, more reliable acidification.
Related: How to Make Mead at Home — Beginner's Guide | WhichBrewForYou
How Do You Maintain SCOBY Health Between Batches?
Continuous brewing maintains SCOBY health through regular feeding cycles, while intermittent brewing requires specific storage protocols. SCOBYs thrive on consistent brewing schedules, though they tolerate storage breaks of several months when properly maintained.
For continuous brewing, start a new batch immediately after harvesting finished kombucha. The SCOBY remains in the vessel with sufficient starter liquid (10-20% of vessel volume), receiving fresh sweet tea as soon as the previous batch is removed. This approach maintains stable microbial populations and reduces hands-on handling time.
Storage breaks require creating a "SCOBY hotel"—a glass jar containing the culture submerged in strong starter tea or finished kombucha. SCOBYs stored this way at room temperature remain viable for 2-3 months without feeding, though they gradually consume available nutrients and produce increasingly strong liquid. Refrigerated SCOBYs slow metabolic activity, remaining viable for 6+ months. Revive stored cultures by starting 2-3 short fermentation cycles (3-5 days each), discarding the resulting kombucha until flavor normalizes.
SCOBY Multiplication and Sharing
Each fermentation cycle produces a new SCOBY layer atop the liquid surface. These layers can be separated and used to start multiple vessels, shared with friends, or composted. There's no advantage to maintaining extremely thick SCOBY formations—most brewers separate and remove excess layers when they exceed 3-4cm thickness.
Extra SCOBYs make excellent compost material due to their cellulose content and nitrogen-rich composition. Some brewers also use them in smoothies, dog treats, or as face masks, though these alternative uses lack scientific validation for health benefits.
People Also Ask
Can you brew kombucha without a SCOBY?
Kombucha requires the microorganisms present in a SCOBY or strong starter liquid to ferment properly. You can grow a new SCOBY from raw store-bought kombucha over 2-4 weeks, which initiates fermentation without purchasing an established culture. The cellulose mat (SCOBY disk) is optional if sufficient starter liquid provides the necessary bacteria and yeast.
How much caffeine remains in finished kombucha?
Finished kombucha contains approximately 10-25mg of caffeine per 240ml serving when brewed with black tea, compared to 40-70mg in the original tea. Fermentation reduces but doesn't eliminate caffeine as microorganisms metabolize some caffeine during the process. Green tea kombucha contains roughly 30% less caffeine than black tea versions.
Is it normal for kombucha to have floating particles?
Brown stringy particles and sediment are normal byproducts of yeast activity and cellulose production during fermentation. These particles are harmless and can be consumed or filtered through cheesecloth during bottling. Clear kombucha requires additional straining but doesn't differ nutritionally from cloudy versions.
Expert Verdict
Home kombucha brewing succeeds consistently when beginners prioritize three fundamentals: maintaining proper fermentation temperature (22-26°C), using adequate starter liquid (minimum 10% by volume), and exercising patience during first fermentation. The learning curve spans 3-4 batches as new brewers calibrate timing to their environment and taste preferences. Equipment costs remain under $50 for complete startup supplies, while ongoing ingredient costs average $0.60-$0.90 per liter—representing 80-85% savings versus commercial kombucha. The process requires minimal active time (30-45 minutes per batch) once established, making it accessible even for busy households. Quality ingredients, particularly premium loose leaf teas from BellofattoBrews, produce noticeably superior flavor complexity compared to generic bagged teas. With proper technique, home brewers produce kombucha that matches or exceeds commercial products in flavor, carbonation, and probiotic content.
Article Summary
- Successful kombucha brewing requires only four ingredients (tea, sugar, water, starter liquid), one SCOBY culture, and basic glass containers—total startup investment under $50.
- First fermentation takes 7-14 days at 20-27°C, transforming sweet tea into probiotic-rich kombucha through bacterial and yeast activity that reduces sugar content by 60-80%.
- Second fermentation in sealed bottles produces carbonation and allows custom flavoring with fruit, herbs, and spices over 2-4 additional days.
- Maintaining pH between 2.5-3.5 protects against contamination and ensures food safety—achieved through adequate starter liquid (minimum 10% by volume).
- Home-brewed kombucha costs $0.50-$1.00 per liter with ongoing supplies, representing significant savings while providing complete control over flavor, sweetness, and ingredient quality.
Frequently Asked Questions
How long does homemade kombucha last in the refrigerator?
Properly bottled and refrigerated kombucha maintains quality for 2-3 months, though flavor continues evolving as residual yeasts slowly ferment remaining sugars. Carbonation levels peak within the first month, then gradually decrease. Kombucha doesn't spoil in traditional ways due to its acidic pH but may become overly vinegary after extended storage.
Can you use decaf tea to make kombucha?
Decaffeinated tea produces successful kombucha though fermentation may proceed more slowly since caffeine supports yeast metabolism. Mixing 50-75% caffeinated tea with 25-50% decaf provides a middle ground with reduced caffeine while maintaining robust fermentation. Completely caffeine-free herbal tisanes alone cannot sustain long-term SCOBY health.
Why is my SCOBY sinking instead of floating?
SCOBY position doesn't affect fermentation success—cultures may float, sink, orient vertically, or hover mid-jar depending on their density and gas pocket formation. A new SCOBY layer forms on the liquid surface each batch regardless of the mother culture's position. Only mold growth indicates problems, not SCOBY orientation.
What does mold on kombucha look like?
Mold appears as fuzzy circular spots in colors like green, black, white, or orange, typically forming on the SCOBY surface or liquid top. Mold looks distinctly different from normal yeast strands (brown, stringy) and SCOBY growth (smooth, cream-colored). Moldy batches must be discarded entirely including the SCOBY and all liquid.
How do you know when kombucha is ready to bottle?
Kombucha reaches bottling readiness when taste testing reveals a balanced sweet-tart flavor that matches your preference—typically 7-14 days. pH testing provides objective measurement: finished kombucha should register between 2.5-3.5 pH. The beverage should taste pleasantly acidic like apple cider vinegar diluted in juice, not overwhelmingly sour.
Can you brew kombucha in a plastic container?
Food-grade HDPE plastic (marked with recycling #2) works for kombucha fermentation though glass remains preferable for monitoring fermentation visually and avoiding plastic degradation over time. Never use containers that previously held non-food items. Most experienced brewers choose glass for primary fermentation due to its complete inertness and transparency.
More Kombucha Articles
This article was produced by an automated research tool. Content is for informational purposes only and should not replace professional advice. Product and resource links throughout this article are included for informational value based on relevance and quality. WhichBrewForYou has no affiliate relationship with any linked third-party site and receives no commission from any recommended products or brands. BellofattoBrews (coffee and tea) and Golden Hive Mead (mead kits and resources) are personal recommendations from this publication's founder and have no affiliation with WhichBrewForYou.